How to manage and pay invoices on the Customer Portal
This article describes how to manage and pay your invoices using the Customer Portal.
Managing invoices
To manage your invoices, follow these steps:
- Log in to the Customer Portal.If you do not know how to log in to the Customer Portal, please see this article.
- On the menu bar, click , and then click :
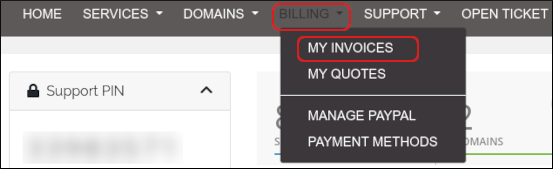
A list of invoices appears:
- To sort the list of invoices, click a column heading. For example, to sort your invoices by due date, click the Due Date heading.
You can filter the list of invoices to only display paid, unpaid, cancelled, or refunded invoices. To do this, in the Status sidebar, click the invoice status you want to view.
- To sort the list of invoices, click a column heading. For example, to sort your invoices by due date, click the Due Date heading.
To view the details for an invoice, click it.
- To print a copy of the invoice, at the bottom of the page, click .
- To download a copy of the invoice in PDF format, at the bottom of the page, click .
Paying an invoice
To pay a specific invoice, follow the procedure above to view an invoice. You can specify the payment method and pay directly from the invoice statement.
Payment methods
A2 Hosting accepts several payment methods:
- PayPal
- Bank transfer
- PayU Latam (Argentina, Brazil, Colombia, Mexico, Peru)
- Skrill
- UnionPay (through Stripe)
- Credit card (Visa, MasterCard, American Express, and Discover)
- Check or money order. To pay by check or money order, please mail your payment to the following address.
Make sure you include the invoice number on your check!A2 Hosting, Inc.
P.O. Box 2998
Ann Arbor, MI 48106
After we receive your payment, we will send you a confirmation message by e-mail.
- To pay by wire transfer, select Bank Transfer as the payment method when you place your order. We will send you an invoice with our bank information. Please note that your purchase is not activated until we receive the transfer. This process can take up to 10 days.
- We do not accept ACH (Automated Clearing House) payments at this time.
- We do not accept Bitcoin payments at this time.
Cancelling a line item in an invoice
If you receive an invoice with a line item that you do not want to renew, you can cancel it. To do this, follow these steps:
- Log in to the Customer Portal.If you do not know how to log in to the Customer Portal, please see this article.
- To cancel a hosting-related item:
- On the menu bar, click , and then click :
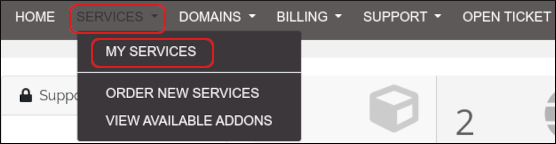
- Click the product or service you want to cancel.
- Under , click .
- Under Reason for Cancelation, please select the reason.
- In the Final Comments text box, you can optionally provide additional comments.
- In the Cancellation Type list box, select whether you want the cancellation to be immediate, or occur at the end of the billing period.
- Click .
- On the menu bar, click , and then click :
To cancel a domain-related item:
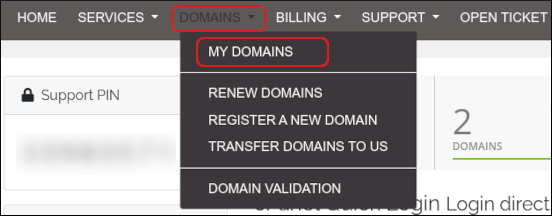
- On the menu bar, click , and then click :
Select the check box next to the domain you want to cancel:
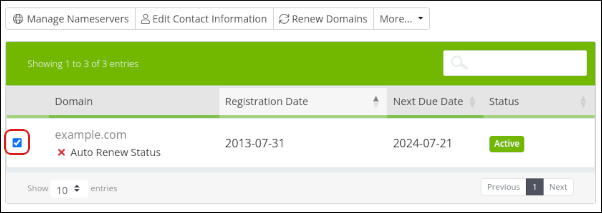
Click More, and then click Auto Renewal Status:
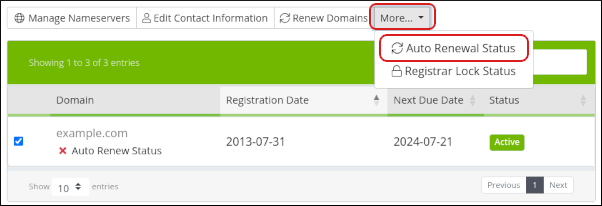
- The renewal status for the domain appears. If auto renew is enabled, click .
- On the menu bar, click , and then click :
Article Details
- Product: All accounts
- Level: Beginner
Grow Your Web Business
Subscribe to receive weekly cutting edge tips, strategies, and news you need to grow your web business.
No charge. Unsubscribe anytime.
Did you find this article helpful? Then you'll love our support. Experience the A2 Hosting difference today and get a pre-secured, pre-optimized website. Check out our web hosting plans today.